
Start with the classroom need, then choose the right tool
Google Flow and Google Vids overlap, but they solve different parts of the job. Flow is useful when you need to generate and refine a specific visual movement using text, first-and-last frames, ingredients, or another video. Vids is the scene-based editor where you can combine those clips with slides, images, narration, captions, recordings, and questions.
For a teacher, the goal is not producing a long AI film. It is making one process, movement, transition, or imagined situation easier to see and discuss, then placing that moment inside a clear instructional sequence.
Plan for the teacher to create, review, and download the material. Google currently requires Flow users to be at least 18 and availability differs by country or region. School administrators can also control access to Vids and its Gemini features. Learners can watch the finished MP4 on the classroom smart board without needing their own Flow or Vids accounts.
Eligible users without a Google AI subscription may receive free Flow credits, while Google AI Plus, Pro, and Ultra plans provide different allowances and features. Credit costs depend on the selected model and generation settings, so check the value shown inside Flow before generating. Free, Plus, and Pro Veo videos may include a visible AI watermark.
The basic Vids editor is available with a Google Account in supported locations, while AI video generation, avatars, voiceovers, and other Gemini features depend on the account or Workspace plan. Teachers using a school account should first check which features their administrator has enabled.
Tools mentioned
A useful classroom video shows one idea clearly and gives learners something specific to notice, predict, or explain.
Step 1: choose one learning moment
Begin with a moment that is difficult, unsafe, too slow, too fast, too small, or impossible to demonstrate in the room. Reduce it to one short visual event. A six-second clip of a ball changing direction is more teachable than a two-minute AI film about the laws of motion.
Write the question learners will answer after watching before you generate anything. This prevents the video from becoming decoration.
Planning formula
Learning objective → one visible event → one observation cue → one pause question

Example:
Objective: Explain how an applied force changes an object's motion.
Visible event: A football begins at rest, is kicked, accelerates, and changes direction.
Observation cue: Watch the ball immediately before, during, and after contact.
Pause question: What evidence shows that a force changed the ball's motion?
- Concept: What should learners understand?
- Visible event: What movement or change would make that idea observable?
- Attention cue: What should learners watch closely?
- Pause question: What should they predict, identify, compare, or explain?
- Accuracy check: What could the generated video misrepresent?
Step 2: prepare a simple Flow project
Open Flow on a computer and create one project for the lesson. In the generation settings, choose Video and confirm the active model, aspect ratio, clip length, number of outputs, and credit cost. For most classroom displays, landscape 16:9 is the practical starting point.
Generate one output first. More variations use more credits and make review slower. Keep each concept in its own project or clearly named collection so you can find the approved clip later.
- Use landscape orientation for a typical smart board.
- Start with one short output rather than several variations.
- Name the project after the topic and learning objective.
- Check the selected model supports Frames or Ingredients before uploading assets.
- Save the successful prompt beside the lesson plan for future reuse.
Step 3: use a prompt formula that controls the motion
A classroom prompt should describe the visible evidence, not only the topic. “Create a video about force” leaves nearly every decision to the model. Describe the subject, action, environment, camera, visual treatment, timing, and anything that must not appear.
Keep the camera instruction simple. A fixed side view often communicates classroom motion more clearly than a cinematic orbit, zoom, or rapid cut.
Google Flow prompt formula
[SUBJECT] + [STARTING STATE] + [ACTION OR CHANGE] + [ENDING STATE] + [ENVIRONMENT] + [CAMERA] + [VISUAL STYLE] + [TIMING] + [ACCURACY CONSTRAINTS] + [EXCLUSIONS]

Write it as:
Show [SUBJECT] beginning with [STARTING STATE]. It then [ACTION OR CHANGE] and ends with [ENDING STATE]. The scene takes place in [ENVIRONMENT]. Use a [CAMERA] view in a [VISUAL STYLE] style. The action should happen over [TIMING]. Preserve [ACCURACY CONSTRAINTS]. Do not include [EXCLUSIONS].
Short follow-up formula
Keep everything else unchanged. Revise only [ONE VARIABLE].

Make [SPECIFIC CHANGE].
Preserve [SUBJECT / COMPOSITION / CAMERA / BACKGROUND / TIMING].
Do not add [UNWANTED ELEMENTS].
Step 4: create a football motion clip with first-and-last frames
Suppose you want learners to observe how contact changes a football's motion. Prepare two rights-cleared images with a similar player, kit, camera angle, lighting, and background. The first should show the player approaching a stationary ball. The second should show the finishing pose with the ball moving away.
You may use Google Images to discover possible sources, but an image appearing in search results does not give permission to reuse it. Prefer your own photographs, school-approved assets, public-domain material, Creative Commons images whose licence permits your use, or properly licensed stock. Avoid identifiable children unless your school has explicit permission.
If your player and background are separate assets, first create two clean composite images: a starting frame and an ending frame. This gives Flow a clear visual destination. In Flow, choose Video, then Frames, and add them as the start and end frames.
Prompt: animate the football motion
Use the uploaded first frame as the exact starting composition and the uploaded last frame as the intended ending composition.

A football player takes two controlled steps toward the stationary ball, plants the non-kicking foot beside it, and makes clean contact with the inside of the kicking foot. The ball accelerates smoothly along the ground toward the right side of the frame. The player completes a natural follow-through.

Use a locked side-view camera at waist height. Keep the same player, uniform, football, pitch, lighting, and proportions throughout. Show the movement clearly over 6 seconds at realistic speed.

Do not add other players, spectators, text, logos, dramatic camera movement, slow-motion effects, or a second football. Avoid body distortion and keep the ball's path physically plausible.
Classroom observation prompt
Watch the ball immediately before, during, and after the player's foot touches it.

1. What changes?
2. When does the change begin?
3. What evidence suggests that a force acted on the ball?
4. What would you predict if the kick used less force?
- Frame 1: side view, stationary ball, player approaching, uncluttered pitch.
- Frame 2: same side view and player, follow-through pose, ball travelling forward.
- Background: use the same pitch, horizon, lighting, and visual style in both frames.
- Instruction: describe only what should happen between those two frames.
- Review: reject extra limbs, changing uniforms, impossible ball paths, unsafe movement, or continuity errors.
Step 5: use Ingredients when consistency matters
Frames control where a clip begins and ends. Ingredients are visual references that help Flow reuse a character, object, location, or style. Use them when you need the same football, laboratory setup, historical setting, or illustrated character across several clips.
Clean references work better than busy pictures. Place the main subject on a plain or clearly separated background where possible, keep the visual style consistent, and explicitly tell Flow what each reference represents.
Prompt: reference three ingredients
Use @player as the reference for the same football player and uniform.
Use @ball as the reference for the football's colour, size, and markings.
Use @pitch as the reference for the location, camera direction, lighting, and background.

Create a side-view clip in which the player passes the ball smoothly across the pitch. Preserve the identity and appearance of every referenced ingredient. Do not introduce additional people, balls, branding, or text.
Frames define the journey. Ingredients help preserve who and what appears during that journey.
Step 6: move the approved clip into Google Vids
Use Flow to create the motion-rich visual, then use Vids to build the teachable sequence around it. Download the approved Flow clip and open vids.new. Start with a landscape Vid for a typical smart board, then upload the Flow clip into its own scene.
A simple classroom Vid can use three scenes: a prediction question before the clip, the generated clip itself, and an explanation or transfer question afterward. This structure keeps the video connected to learning rather than turning it into passive viewing.
You can also convert an existing Google Slides presentation into Vids. Each slide becomes a scene and its speaker notes can become the starting script. Replace only the scene that needs motion with the approved Flow clip.
- Scene 1 — Predict: state what learners should watch and ask for a prediction.
- Scene 2 — Observe: play the Flow clip without covering the important movement with text.
- Scene 3 — Explain: replay, pause, or use a still frame while learners identify evidence.
- Scene 4 — Transfer: change one condition and ask learners what should happen next.
Step 7: generate a clip directly inside Google Vids
If your account includes AI video clips, Vids can generate a clip without leaving the editor. Open AI video from the right sidebar, choose Create, describe the scene, and optionally upload Ingredients. Google currently allows up to seven reference images for a generated Vids clip, though limits and availability can change.
Use this route when the generated clip is one part of a larger Vid and you want to stay inside the same timeline. Use Flow when you need more deliberate frame control, repeated visual consistency, scene extension, or deeper clip refinement.
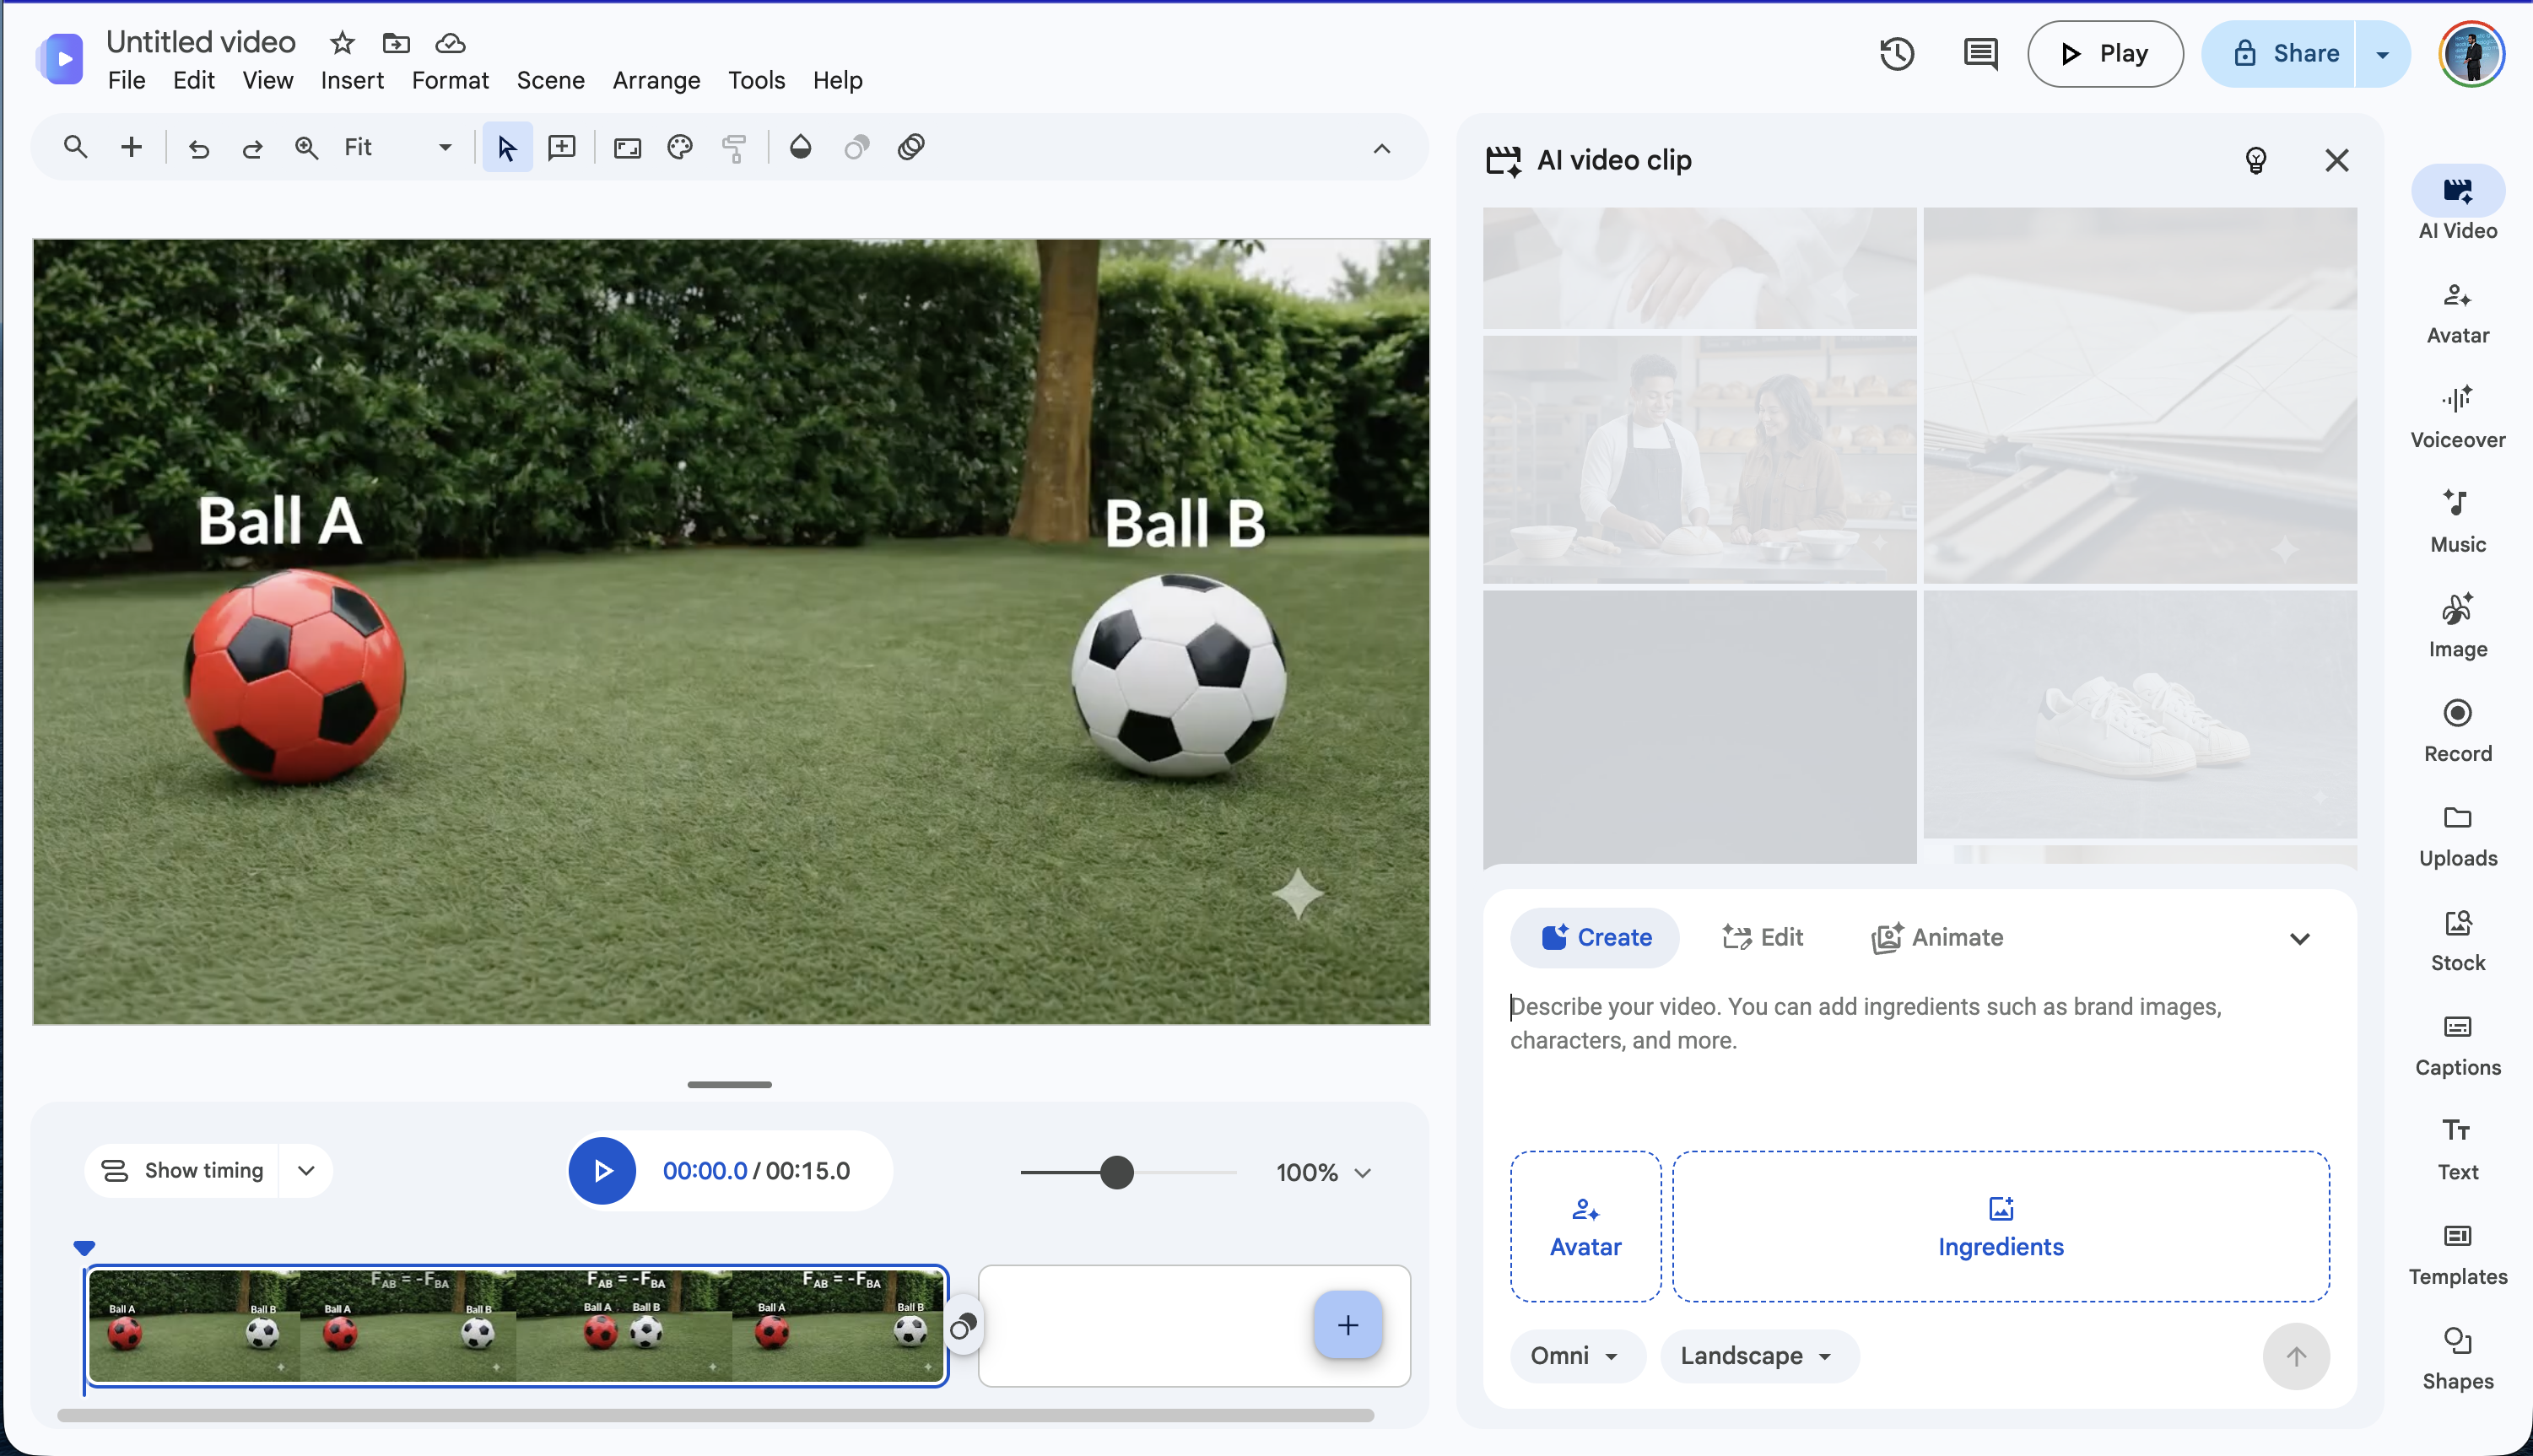
The football setup shown below uses two ball references and a common field background. The prompt must tell Vids what each image represents and what relationship or motion it should demonstrate.
Google Vids prompt: show action and reaction
Use Ball A and Ball B as the exact visual references for the two footballs. Preserve their colours, patterns, size, and the grass-field background.

Ball A rolls from left to right and makes clear contact with Ball B. At the moment of contact, Ball A slows down while Ball B begins moving to the right. Show the action at realistic speed using a locked, eye-level side view.

Keep both balls visible throughout the clip. Preserve the same lighting, field, scale, and camera position. Do not add players, feet, hands, extra balls, text, logos, dramatic camera movement, or unrealistic bouncing.
Add the visual references as Ingredients
Open AI video, choose Create, upload the reference images under Ingredients, select Landscape for a smart board, and describe the exact motion between the objects.
 Full size
Use Flow for greater control over the generated shot. Use Vids when generation, assembly, narration, captions, and classroom playback need to stay in one project.
Step 8: add explanation, narration, and accessibility
Once the visual sequence is correct, add only the support learners need. Use concise on-screen questions, a teacher recording, an available AI voiceover, or captions. Avoid narrating every visible detail; direct attention to the evidence that matters.
Vids behaves more like a collaborative presentation editor than a complex film editor. You can change scene timing, animate text or images, add stock or uploaded media, record your screen or camera, invite a colleague to comment, and reuse the file for another class by making a copy.
- Add captions or a written transcript for spoken explanations.
- Keep essential labels large enough to read from the back of the room.
- Do not place text over the movement learners must observe.
- Use audio only when it adds meaning; test volume on the classroom speakers.
- Include a verbal or written description of important visual information.
- Make a clean copy before adapting the Vid for a different class or language.
Other classroom scenarios worth trying
Use Flow where motion or change carries the meaning. The generated clip should lead into explanation, comparison, or practice—not replace them.
- Science: animate condensation forming on a cold surface, then ask learners where the water came from.
- Biology: show a stylised seed germinating over time, clearly labelling the video as a compressed representation.
- Geography: visualise river erosion at an outer bend and ask learners to identify where water moves faster.
- Mathematics: animate a geometric transformation while keeping axes and scale fixed.
- Language learning: create a short silent situation, pause, and ask learners to write the dialogue.
- History: create a clearly labelled reconstruction based on sources, then compare it with the original evidence and discuss what remains uncertain.
- Safety training: illustrate the sequence around a laboratory hazard, but use approved procedures and never treat an AI clip as the authoritative safety demonstration.
Step 9: review the finished video like a teacher
Watch every generated frame before showing the class. A polished clip can still contain a wrong sequence, implausible movement, misleading scale, invented text, stereotypes, or distracting visual errors.
Regenerate by changing one variable at a time. If the motion is correct but the camera moves, ask Flow to lock the camera and preserve everything else. This is faster and more reliable than rewriting the entire prompt.
- Is the central concept represented accurately enough for this age group?
- Could learners infer the wrong cause, sequence, scale, or relationship?
- Are people represented appropriately and without harmful stereotypes?
- Do you have permission to use every uploaded asset?
- Does the clip expose any learner or school-identifying information?
- Can you explain which parts are simplified, reconstructed, or AI-generated?
Step 10: download it for the smart board
If you are staying in Flow, download one approved clip from its asset menu or use Scenebuilder to arrange and trim several clips before downloading the scene. If you assembled the lesson in Google Vids, use File and Download as MP4, or export the finished video to Google Drive.
Test the downloaded file on the classroom computer before the lesson. Keep a local copy so the activity does not depend on internet access. Put the observation question on the slide before the video, play the clip once without discussion, then replay and pause at the decision point.
- Before viewing: ask learners to predict what they expect to change.
- First viewing: let them watch the whole clip.
- Second viewing: pause at the important moment and collect evidence.
- After viewing: ask learners to explain the concept without referring to the video.
- Transfer: change one condition and ask for a new prediction.
Tools mentioned
The learning happens in the prediction, observation, explanation, and transfer—not in pressing play.
Written by
Sameer Ahmed